Sunday, December 4, 2011

Dress Form (heavy photo post)

I bought this dress form a few weeks back. I knew I wanted to play with it but, it was one of those moments where I was afraid I'd mess it up. I often buy things I know I want to do and then fuss and fuss over messing them up. Meanwhile I tell all my craft Friends when their starting out there is no messing things up just learning.. sooo a few ideas and a glass of wine later, I dove right in. I took pictures along the way to serve as a bit of a tutorial for you all. Dress forms are all the rage right now in the crafting world and I've seen them turned into moo much; jewelry holders, stick pin cushions, etc. I just love the eclectic feel of it all.


Now I stained it white, not knowing the full direction it was going in, however I really didn't need to since I later decided to cover it.


I crinkled up some Tim Holtz glassine paper and then inked them up with the new Christmas distress inks. 

Great way to cut tulle, is to wrap it around a piece of cardboard and then cut on both ends, this can be done on little sets as well as something like a little girls tutu. Makes for great evenly cut pieces.

I then glued it to a piece of paper.

after the ink was done drying, I pleated the glassine.

I added some lace to the top of the tulle and then clipped it to ensure it dries well.

I tore pieces of canvas and then misted it, crumpled it up and let it dry. I didn't go for even coverage just some added color.


Adhere the pieces to the form.

Cover the form.


Wrap the glassine around the form.

I added the tutu then. And a cute stick pin, I later removed. I also, inked up the tutu a bit and added another piece of lace to it. I then took the heat gun to the skirt a bit to make it a bit less poofy!

I then put together a few jump rings and some misc. charms and things.


I used stick pins through the form to attach the fun metals charms.


I then added some tattered angels mists along the tears of the canvas and then spritzed it with water. Look at the below pic for the results.


Weekend Creativity

Yesterday I lived in my craft room. Something came over me and I decided rather than naming all the things I should be doing instead I would just put all the must do's on the back burner and do what I "wanted" to do. It was somewhat freeing. I had worked on two altered projects. Both I'm quite happy with. If you missed the beginning of this project it can be seen HERE. Below is the rest of the project. I'll admit it's probably not completed, as I will add this and that too it over the next few days I'm sure.  here is the first part of this weekend play time. Be sure to check out the link above to see what I began with.I'll be posting here shortly the other post, so as to not make this too post too picture heavy.


Thursday, December 1, 2011

Girlie Card

Hmm it's 9:00pm. I'm talking to my boyfriend via chat while he's in class, when all of a sudden it hits me! SHHHHIIIITTTTTT I totally forgot I needed to make a card for a woman's birthday tomorrow. Now if it were just a run of the mill worker I'd give her a generic card I keep at work in case I forget someones birthday, but she's a manager. She deserves something special! Only woman Manager in the company. I rush into my scrap room, I have to make a card.

Now cards normally take me about 45 minutes or so to make for the women because I put a bit more into them. Men's cards have become quite easy for me, but women.... well, I like to make them special, since there's only about 10 of them total if that that work for the company. As not too many women unless int eh office strive in a landscaping company. Anywho, I sit down and oh my.. got this card done in 20 minutes!!! I decided to take some pictures along the way to show you how I did it all.

I added some cardstock to the front of the card. Simple enough.

I then stamped over some vintage book page with a birthday stamp. I them took a sharpie and colored in one of the words.

To add a bit more, i colored in more words and then also used a colored pencil for some of it.

I then ran some pan pastels over the text to lighten the colors up a bit. I like how it lightened how bold they originally were. the colors were a bit too bold for the card background colors.

Sorry its blurry. I then added some Helmar Zap dots to the back of the text, I'm using these instead of scrap dots as i plan to add some stick pins to this card and the pins will stick well into the foam pieces.

I then cut a few vines from a Prima vine. i added them along the sentiment.

I then added a bit of staz-on to some text leaves. I love these things!

I then places the pin, leaves and butterflies on the right hand side. Then added some coordinating flowers with the script leaves peaking out slightly behind them.

I then did some stitching along the sides of the card. Added the inside pieces and did some inking and stamping. I also ran some Helmar Gemstone glue along the bottom tear and glittered it up with some vintage silver.

I then added some tim Holtz stain to a Prima resin piece.

I also took my heat gun to these lovely Prima flowers. I did this as it makes them curl up a bit around the pearl. See the finished product below to see how it worked out.. lovely affect.

Here is the finished front of the card.

Two things here. I spritzed the inside a bit with some silver tatttered angels mists and then also when the glue was drying on the glitter I took the heat gun to it to add that splattered look and then coated in glitter again.


Wednesday, November 30, 2011

Who Doesn't Love Some TIM!

Ok, every year at about this time. I get very excited!!! I mean there's the obvious reasons. Christmas, kids excitement, the smell of pine, lights, snow, just the overall season! However, there's another big reason that I get excited. December means that Tim Holtz does he 12 tags of Christmas. I love all of the Tim Holtz products as most of you know. I love being inspired by him. When he does these tag, I get down right giddy! I can't wait to see what he does and then try them out. Now it's a rare occasion that I ever make a tag! But I always dive in come December! So, I thought I would share some of the love in case you haven't participated in this before. Here in the blog: HERE FOR HAPPINESS !!!! Here is a little skit and information about the tags.

 Now not everyone is into crafting or tags. So I'm sharing pictures of his last 4 years of tags! I mean these alone will make any gift, wrapped or not, just wonderful. Now remember what I always say, Just because you see all these things done, doesn't mean you need to run out and buy these products he uses. Instead.. I challenge you to just take something away from each day. you may not make a tag and you may not make anything that looks anything like his, maybe you just use it as motivation!

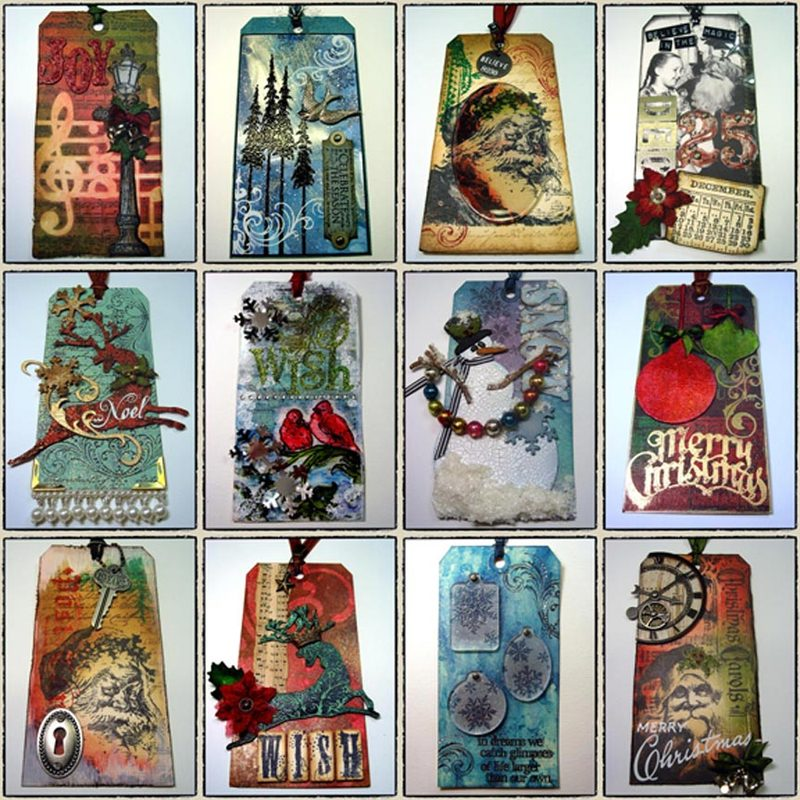
Here are the past 4 years in order 2007, 2008, 2009, 2010. Some of them are larger than normal, so load time may take a moment, but I wanted you to be able to view all of the great details! Now even if you don't craft these simply have to put you in the Christmas spirit!


Monday, November 28, 2011

Work In Progress

I thought I would do a little sharing tonight. In my spare time I've been doing some playing around with some cheapo wooden frames I found at the local Dollar Tree. I love these things. Here's a little tutorial for what I did with them thus far. My advice. Any of you out there who love those Tim Holtz configuration boxes but can't bring yourself to buy them for 10-30 dollars. This is a great alternative. For a whole 6 bucks total after all materials.. even glue, inks and stains. How frickin cool is that!

Ok here, I took a small saw and sawed some of the pieces to make them different sizes. These boxes are a simple 7x7 unfinished box.

I then took Helmar 450 Quick Dry Adhesive and applied it to the sides after I decided how I wanted them. I choose this glue not only because I love it but also because when it tried if you get any over the edge you can simple rub it off with your finger or light sanding.

I use large clips to hold them in place while the dried. Which doesn't take much time at all but make sure their really secure.


Here I am just showing you how you could make these into any shape you so wish. I did something a bit longer and staggered but you could also make a cute cube.

I then used some Tim Holtz stains, as well as some Tattered Angels mists to get the distressed look I was going for. I like the glitz form the mists as well, gives it something fun. I'm very very happy with the aged look it has. I'll keep everyone posted on how I alter it further from here.